@willow-dls/core
Willow Digital Logic Simulator
Willow DLS is a digital logic simulator written in TypeScript with support for loading and executing circuits written using educational logic simulators such as CircuitVerse, JLS and LogiSim. It is platform- and simulator-agnostic, and is primarily intended to be used for headless testing of circuits via a unit testing framework such as Jest. Willow was created as an undergraduate capstone project at Grand Valley State University but is now published as an open-source package.
Willow is a headless DLS framework. It does not implement a GUI and has no intentions to do so. The intended use cases are:
- Students, instructors, and others who use graphical educational simulators and want to test circuits using a familiar unit testing framework (as opposed to the table-based ad-hoc techniques that many simulators provide).
- Software developers who want to write a DLS GUI in TypeScript using Willow as the actual logic engine.
Willow targets the NodeJS execution environment. It currently will not run client-side in the browser due to dependencies on the NodeJS standard library. (Most of these dependencies are in the circuit loading logic; theoretically we just have to decouple the loading logic. In principle, it would be straightforward to move the circuit loading into a separate package to enable client-side browser execution.)
Features
- Extensible: Willow makes no assumptions about the tool used to generate a circuit or what elements it contains. While Willow contains a default set of base elements and circuit loaders, it is designed to allow users to easily define custom circuit elements and circuit loaders.
- Simple: Willow uses a simple event loop to evaluate circuits. It avoids overly complex algorithms and performance optimizations so as to allow users to more easily understand and modify it. The relative simplicity compared to other circuit simulators is intended to lower the barrier to entry and allow students to not only simulate/test their own circuits, but also understand how circuit simulators can be implemented.
- Robust Logging: The custom logging facility is as extensible as the rest of the engine. It allows users and developers to inspect just about any part of the engine as a circuit runs, which can be helpful in debugging either the engine itself or circuits running it it. Logs are extremely granular, with log levels and subsystem tags, providing the ability to drill down and see logs for only a certain part of the system, or capture everything all at once.
- Well-Documented TypeScript: Willow is written fully in TypeScript, making it easier to use because the type system can catch common errors and mistakes. Furthermore, Willow is extremely well-documented, including full API documentation and sample code.
Getting Started / First Example
We expect the most common use case for Willow will be to unit test circuits generated by an educational digital logic simulator. This example walks through the setup for testing a CircuitVerse circuit using Jest and plain JavaScript.
The basic idea is that you need only set up a new NPM project, install Willow and Jest as dependencies, then add the circuit under test and any test files:
If this is your first NodeJS project, make sure you have Node and NPM installed on your machine. Instructions can be found here. You will also have to set up a new NPM project where your own code will live. You can do so by creating an empty directory and running
npm init.
- Create a new directory for your project
$ mkdir TestMyCircuit
- Move into this new directory
$ cd TestMyCircuit
- Create a new node project: (You may simply accept the default answer to each question.)
$ npm init
- Install Willow into your project with the following command:
$ npm install @willow-dls/core
- Install Jest (or your preferred unit test framework)
$ npm install jest
-
Add your circuits and test files.
-
Run the tests:
$ npx jest
Using Templates
Willow provides template repositories that you can clone to simplify project setup.
For example, to use Jest and plain JavaScript, you can simply git clone or download this template:
!!! Verify new template repo name !!!
$ git clone https://github.com/willow-dls/example-js.git
$ cd example
$ npm install
These commands will automatically install the necessary dependencies. At this point you need only add your circuits and tests.
Using Typescript
If you prefer to write your unit tests in Typescript, simply git clone or download this template:
!!! Verify new template repo name !!!
$ git clone https://github.com/willow-dls/example-ts.git
$ cd example
$ npm install
This template also contains the configuration files for Typescript and Babel.
If you prefer to configure your package manually, see Manual Typescript Configuration below
Writing Unit Tests
** TO DO **
Manual Typescript Configuration
If you prefer to manually install and configure Jest and TypeScript:
Step 0: Install Dependencies
If you don't already have NodeJS and NPM installed, go ahead and make sure those are installed and available in your shell's PATH.
Step 1: Initialize Workspace
Start by creating a folder for your circuits to live and installing the simulator as well as the unit testing framework.
$ mkdir my-circuits
$ cd my-circuits
$ npm init
$ npm install --save-dev jest typescript @types/node @types/jest @jest/globals @babel/preset-env @babel/preset-typescript
$ npm install @willow-dls/core
Next, configure TypeScript by creating a tsconfig.json in the root of your project directory. We have this in ours; you should be able to copy and paste it without any modifications.
{
"include": ["src/**/*.ts", "src/**/*.d.ts", "src/**/*.tsx", "src/**/*"],
"compilerOptions": {
"moduleResolution": "node",
"isolatedModules": true,
"lib": ["esnext", "dom"],
"declaration": true,
"allowJs": true,
"target": "esnext" /* Set the JavaScript language version for emitted JavaScript and include compatible library declarations. */,
"module": "esnext" /* Specify what module code is generated. */,
"outDir": "./dist" /* Specify an output folder for all emitted files. */,
"esModuleInterop": true /* Emit additional JavaScript to ease support for importing CommonJS modules. This enables 'allowSyntheticDefaultImports' for type compatibility. */,
"forceConsistentCasingInFileNames": true /* Ensure that casing is correct in imports. */,
"strict": true /* Enable all strict type-checking options. */
}
}
Then, create a Babel config (Jest uses Babel). Babel requires babel.config.cjs in the root of the project directory. We have this in our repository, and again, you should have no difficulties copying and pasting this:
module.exports = {
presets: [
["@babel/preset-env", { targets: { node: "current" } }],
"@babel/preset-typescript",
],
};
We are using the CommonJS module syntax for our Babel configuration for compatibility with Windows—for some reason our Windows developer could not get the ESM syntax to work. However, Willow uses the ESM module syntax for all of the code and is published as an ESM module.
Step 2: Export Your Circuits
In this example, we are using CircuitVerse. If you are using a different circuit simulator, please refer to the documentation for your simulator to export circuits as data files.
Your circuit must assign a unique label to all inputs and outputs. This is because the simulator needs a way to uniquely identify all of the circuit's IO for testing. If you don't assign labels, you will get a "duplicate label" error as all elements have a blank string as their label by default.
From the CircuitVerse simulator with your project open, at the top of the window, click 'Project' and navigate down to 'Export as File'. A window will pop up with a prompt to provide the name of the circuit and a save button.
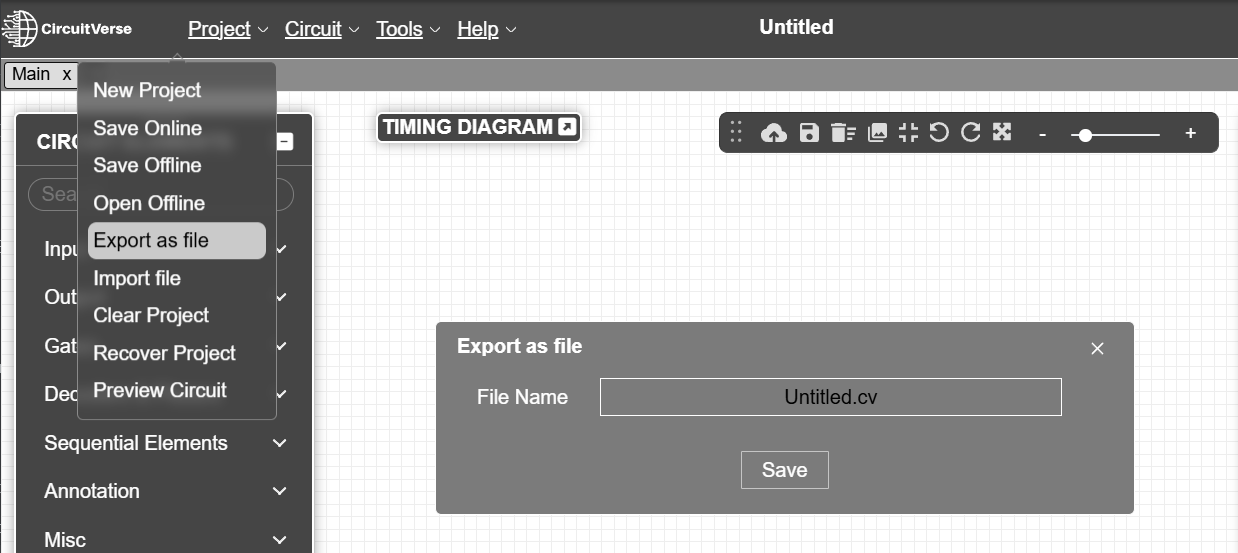
Once you've named your file, save the project. Depending on your browser settings, it will either provide a prompt on where to save it or it will automatically save to your downloads folder on your local computer. In any case, the result should be a .cv file.
Place your .cv file in your project directory.
Step 3: Setting Up Tests
Jest will automatically scan and execute all files ending in .test.js or .test.ts, no further setup required. Create a new file, for example, MyCircuit.test.ts, and populate it with the following contents, editing and replacing the necessary code to fit your use case:
import { expect, beforeAll, test } from "@jest/globals";
import { loadProject, CircuitVerseLoader } from "@willow-dls/core";
let circuit;
// Before running any tests, load your circuit using the CircuitVerse
// loader and Willow's loadProject() function.
beforeAll(async () => {
// Set the file path of your .cv file here.
const cvFile = "MyCircuit.cv";
// If you renamed your circuit in CircuitVerse, set the name
// here. CircuitVerse defaults to Main, so if you didn't change
// your circuit's name, you should be able to leave this
// as-is.
const circuitName = "Main";
const project = await loadProject(CircuitVerseLoader, cvFile);
circuit = project.getCircuitByName(circuitName);
});
// This is a sample test that shows you how to declare inputs and
// outputs as well as run the simulation for basic circuits without
// clocks. You'll have to adjust most of this code to adequately
// test your circuit. You can add more of these test() calls below
// to add distinct tests.
test("Sample Test", () => {
// Declare circuit inputs by label. This object is keyed by the
// labels you assigned to your circuit in Step 2.
const inputs = {
inp1: "01",
inp2: "10",
};
// Declare expected outputs by label. This object is keyed by
// the labels you assigned to your circuit in Step 2.
const expectedOutputs = {
out1: "11",
};
// Execute the circuit, returning the results.
const result = circuit.run(inputs);
// This line is just for demonstration, most likely you won't
// care about the propagation delay.
// expect(result.propagationDelay).toBe(10);
// Compare the actual results to the expected results.
expect(result.outputs).toStrictEqual(exectedOutputs);
});
This file will not work out of the box. You will have to modify it substantially to work with your circuit.
You can add as many test cases to a file as you want, and you can even generate them programmatically as well. Furthermore, you can add as many test files as you want, and Jest will automatically pick them up.
Step 4: Run Tests
Running your tests is the easiest part! On the command line, simply enter the command
$ npm test
Jest will then run through all the test files in your tests folder and check your circuits against your tests. It will then output to your CLI whether your tests have passed or failed. If your tests failed, it will provide the output it received compared to the output it expected.
Example: Building From Source
Sometimes, you may not want to install Willow from NPM, but rather build it from source, most likely for development and testing, or peace of mind. Here's how you do that in your local environment:
- Clone the Git repository:
$ git clone https://github.com/willow-dls/core.git willow-dls-core - Install all dependencies and build the package:
$ cd willow-dls-core
$ npm install
$ npm run build - Go to your NPM package into which you wish to install Willow from source.
- There, run the following command, adjusting the path to the Willow repository:
$ npm install '../path/to/willow-dls-core'`
You should now be able to run your package using the local source code. Note that any time you make modifications to Willow, you will have to re-run the npm run build step to regenerate the JavaScript code.
What Next?
Now that you can run basic tests and have a general understanding of how Willow works, check out the API documentation, taking special note of the following classes, which are the main user-facing classes and functions:
loadProjectandloadCircuit: Used for loading circuits from data. See the subclasses ofCircuitLoaderfor implementations of available loaders, which can take in simulator-specific data and translate it into Willow internal data structures.CircuitProject: Used for storing a collection of circuits. This is what will be returned by a circuit loader.BitString: Used for passing values into circuits and getting values out of circuits.Circuit: Used for actually executing a circuit simulation.
Most of the other classes are used mostly internally. Though they may surface occasionally, you likely won't have to do much with them unless you are implementing your own circuit loader or doing processing/optimization on your circuits once they are loaded into Willow's data structures. If you do want to implement your own loader or your own circuit elements, the following additional classes will also be helpful to you:
CircuitElement: The base class for all circuit elements.CircuitBus: The way that bit values are communicated between elements.CircuitLoader: The base class for all custom circuit loaders.
Contributing
Contributing to this project is as straightforward as most others these days. Just open up a Pull Request on GitHub. However, before submitting your pull request, do remember to do the following:
- Write tests for your new code and make sure they pass by running
npm run test. - Make sure all the existing tests pass by running
npm run test. - Format all code by running
npm run format
Then you can commit and push your changes.
Change Log
v0.4.2
- Added the ability to initialize any labeled element with
Circuit.run(), not just inputs and outputs. This feature was implemented by adding aCircuitElement.initialize()method and refactoring the code inCircuitso that it can call this method on any elements that have a label, not just inputs and outputs.![NOTE] This change means that Willow now checks all of your element labels and will throw an error if there are duplicates. Make sure elements have unique labels.
- Implemented ROMs and RAMs in CircuitVerse and JLS.
- Implemented registers in JLS.
v0.4.1
- Fixed an issue with the TypeScript compilation. We now generate CommonJS modules for easy use with NodeJS.
- Added an example repository and updated the instructions to promote the usage of this repository.
v0.4.0
- Added complete API documentation.
- Implemented the JLS project loader.
- Implemented the Logisim project loader.
v0.3.0
Initial public release after re-branding the internal project.
License
Willow DLS is open source software, released under the MIT license. This means that the source code is available for any purpose, free of charge. That being said, we hope you will contribute back any changes you make to this software via the standard GitHub mechanisms (issues and pull requests) or reach out to us via email. Please refer to the license text below or the LICENSE.txt file present in the GitHub repository.
/*
* Copyright (c) 2025 Jordan Bancino <jordan@bancino.net>
* Copyright (c) 2025 Austin Hargis <hargisa@mail.gvsu.edu>
* Copyright (c) 2025 Aaron MacDougall <macdouaa@mail.gvsu.edu>
*
* Permission is hereby granted, free of charge, to any person obtaining a copy
* of this software and associated documentation files (the "Software"), to deal
* in the Software without restriction, including without limitation the rights
* to use, copy, modify, merge, publish, distribute, sublicense, and/or sell
* copies of the Software, and to permit persons to whom the Software is
* furnished to do so, subject to the following conditions:
*
* The above copyright notice and this permission notice shall be included in all
* copies or substantial portions of the Software.
*
* THE SOFTWARE IS PROVIDED "AS IS", WITHOUT WARRANTY OF ANY KIND, EXPRESS OR
* IMPLIED, INCLUDING BUT NOT LIMITED TO THE WARRANTIES OF MERCHANTABILITY,
* FITNESS FOR A PARTICULAR PURPOSE AND NONINFRINGEMENT. IN NO EVENT SHALL THE
* AUTHORS OR COPYRIGHT HOLDERS BE LIABLE FOR ANY CLAIM, DAMAGES OR OTHER
* LIABILITY, WHETHER IN AN ACTION OF CONTRACT, TORT OR OTHERWISE, ARISING FROM,
* OUT OF OR IN CONNECTION WITH THE SOFTWARE OR THE USE OR OTHER DEALINGS IN THE
* SOFTWARE.
*/